Posts

HOW TO DO FIRE ALARM WITH WATER

Image
 Diagram  CODE   int flame=0;// select analog pin 0 for the sensor int Beep=9;// select digital pin 9 for the buzzer int val=0;// initialize variable int relay= 13;   /* The setup() function is called when a sketch starts. It is used to initialize variables, pin modes, start using libraries, etc. This function will only run once, after each power up or reset of the Arduino board. */   void setup() {  pinMode(Beep,OUTPUT);// set buzzer pin as “output” pinMode(relay,OUTPUT);// set LED pin as “output” pinMode(flame,INPUT);// set flame pin as “input” Serial.begin(9600);// set baud rate at “9600” }   /* The loop() function executes the program repeatedly until Specified. */   void loop() {  val=analogRead(flame);// read the analog value of the sensor  Serial.println(val);// output and display the analog value  if(val>=500)// when the analog value is larger than 600, the buzzer will buzz  {  digitalWrite(Beep,HIGH);  dig...

HOW TO DO 12 LED CHASER WITH 7 EFFECTS USING ARDUINO NANO

Image
  DIAGRAM  CODE  #define t   30 #define t1  20 #define t2  100 #define t3  50 void setup() {   // set up pins 2 to 13 as outputs   for (int i = 2; i <= 13; i++) {     pinMode(i, OUTPUT);   } } /////////////////////////////////////////////////////////////////////////////////Effect 1 void loop(){ effect_1(); effect_1();  effect_2();  effect_2();  effect_3();  effect_3();  effect_4();  effect_4();  effect_5();  effect_5();  effect_6();  effect_6();  effect_7();  effect_7();   } //left to right and right to left void effect_1() { for(int i=2; i<14; i++){ digitalWrite(i, HIGH); delay(t1); digitalWrite(i+1, HIGH); delay(t1); digitalWrite(i+2, HIGH); delay(t1); digitalWrite(i, LOW); delay(t1); digitalWrite(i+1, LOW); delay(t1); } for(int i=13; i>1; i--){ digitalWrite(i, HIGH); delay(t1); digitalWrite(i-1, HIGH); delay(t1); digitalWrite(i-2, HIGH); delay(t1)...

HOW TO DO WI-FI CAR WITH NODE MCU

Image
Diagram  Code /arduino-projects/ Additional Board Manager URL: http://arduino.esp8266.com/stable/package_esp8266com_index.json  #define ENA   14          // Enable/speed motors Right        GPIO14(D5) #define ENB   12          // Enable/speed motors Left         GPIO12(D6) #define IN_1  15          // L298N in1 motors Rightx          GPIO15(D8) #define IN_2  13          // L298N in2 motors Right           GPIO13(D7) #define IN_3  2           // L298N in3 motors Left            GPIO2(D4) #define IN_4  0           // L298N in4 motors Left            GPIO0(D3) #include <ESP8266WiFi.h> #include <WiFiClient.h>  ...

FOR THE BLIND PEOPLE HOW TO DOTHE CAR

Image
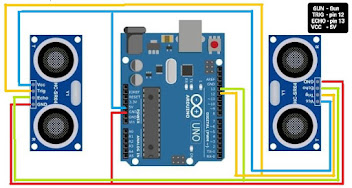
Diagram  Code void setup() { pinMode(12,OUTPUT);//Trigger pinMode(13,INPUT);//EchoA pinMode(6,OUTPUT);//Buzzer } void loop() { long duration, distance; digitalWrite(12,LOW); delayMicroseconds(2); digitalWrite(12,HIGH); delayMicroseconds(10); digitalWrite(12,LOW); duration=pulseIn(13,HIGH); distance=(duration/2)/29.1; if (distance < 70)     // This is where checking the distance you can change the value {  // When the the distance below 100cm digitalWrite(6,HIGH); } else { // when greater than 100cm digitalWrite(6,LOW); } delay(500); } HOW TO DO HC-05 BLUETOOTH CAR  HOW TO DO ULTRASONIC SENSOR CAR 

How to do ultrasonic sensor alarm with Arduino

Image
  Diagram  Code  // defines pins numbers const int trigPin = 9; const int echoPin = 10; const int buzzer = 11; const int ledPin = 13;                             //  Project by - Be innovative with Prasad                                     //   title - ultrasonic sensor project with buzzer and Arduino  // defines variables long duration; int distance; int safetyDistance;                void setup() { pinMode(trigPin, OUTPUT); // Sets the trigPin as an Output pinMode(echoPin, INPUT); // Sets the echoPin as an Input pinMode(buzzer, OUTPUT); pinMode(ledPin, OUTPUT); Serial.begin(9600); // Starts the serial communication }     void loop() { // Clears the trigPin digitalWrite(trigPin, LOW); delayMicroseconds(2);   // Sets the trigPin on HIGH sta...

How To Make HC-05 Bluetooth Controlled Car With Arduino U...

Image
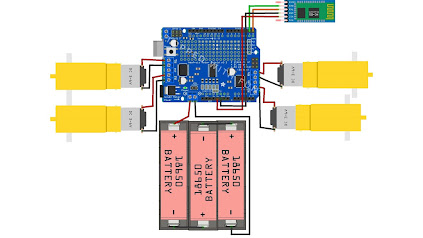
 Diagram Code  #include <AFMotor.h> //initialising motors pin AF_DCMotor motor1(1, MOTOR12_1KHZ);  AF_DCMotor motor2(2, MOTOR12_1KHZ);  AF_DCMotor motor3(3, MOTOR34_1KHZ); AF_DCMotor motor4(4, MOTOR34_1KHZ); char command;  void setup()  {          Serial.begin(9600);  //Set the baud rate to your Bluetooth module. } void loop(){   if(Serial.available() > 0){      command = Serial.read();      Stop(); //initialize with motors stoped     //Change pin mode only if new command is different from previous.        //Serial.println(command);     switch(command){     case 'F':         forward();       break;     case 'B':          back();       break;     case 'L':         left();       break;   ...